
GitHub Actions: Automate deploying to WordPress VIP
A rock solid server is fundamental to all successful enterprise sites. And if you’re using WordPress (and here’s why you should), a managed platform like WordPress VIP is one of the best hosting solutions for digital publishers.
Yet some developers find that the task of deploying code to WordPress VIP isn’t always easy.
Undeterred by this challenge, The Code Company set out to find a solution!
We wanted to create a bespoke automation process that connects GitHub to WordPress VIP. And we aimed to do this without the need for any third-party tools such asCircleCi or TravisCi.
This article shares our learnings and provides a step-by-step guide to getting the most out the GitHub Actions for WordPress VIP Go installations.
What is GitHub Actions
Pushing code from GitHub to an enterprise website is not a simple task. Your work is containerised and you do not have direct access to the server/codebase.
In response to these challenges, GitHub created a nifty workflow automation tool called GitHub Actions. This tool allows you to make code reviews and deploy code, all within the GitHub repository.
“Imagine an infinitely more flexible version of shortcut, hosted on GitHub and designed to allow anyone to create an action inside a container to augment and connect their workflow.”
– Sam Lambert, Head of Platform, GitHub
As WordPress VIP is an Enterprise tier service, the repository comes pre configured with a few things, which are important to understand before diving in.
WordPress VIP users have automatic access to Github Actions
Once you have access to the Github repository, GitHub Actions is available. While it is positioned as an out-of-the-box solution, some customisation is still required (hence this article).
WordPress VIP has separate branches for each of the environments of your application. For example, Production generally lives in the “main” branch and pre-production lives in the “preprod” branch.
WordPress VIP supports CI/CD via “built” branches. These are branches within GitHub into which all of the build files (e.g. you node_modules, vendor directories etc.) should be committed. Anything committed within these branches will be automatically deployed to the respective environments.
These built branches have the suffix “-built” added to them. So, production will deploy all files committed into “master-built” and pre-production will deploy all files committed into “preprod-built.”
So our bespoke approach to automating the deployment process is as follows:
- Run your CI/CD build process in Github Actions. This will include composer, npm, webpack etc.
- This Github Action will commit this deployable code to the “-built” branch.
- WordPress VIP will deploy this code to the respective environment.
Once you understand how the GitHub Actions repository works, you’re ready to get started.
Automating the deployment process
GitHub Actions provides some standard automation tools. Yet, given the complexity of publishing sites, these tools need ‘wiring’ to fit your specific needs.
The Code Company is an agency that champions continuous integration and continuous delivery (CICD). So we need a process that allows us to integrate code multiple times a day.
In 2018, we designed a process for building and deploying WordPress to WP Engine using Bit Bucket Pipelines. The learnings and scripts from this process provided much of the foundations for this WordPress VIP and GitHub Actions automation.
A Step-by-Step Guide to using GitHub Actions to deploy to WordPress VIP
Step 1. Generate the SSH key
In order for Github Action to commit code into your built branches, it needs access to the repository. Do this is by defining a “Deploy Key” within the repository in Github. Then use this ssh key within the Action to push code.
The first step is to generate the SSH key you will use. This can be done via the command line:
ssh-keygen -f ~/.ssh/my-vip-keyYou need to add your public key as a “Deploy Key” within Github so that the Action will have access. This can be done via the repo settings under “Settings” > “Deploy Keys”

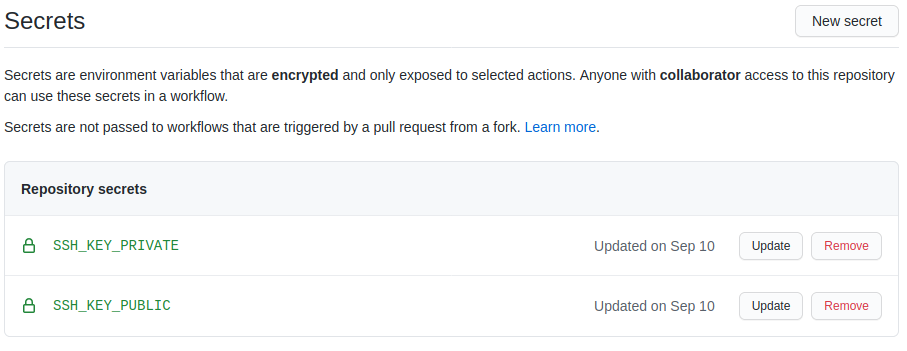
Step 3. Add the Keys within the Github secrets
This is how you will pass the keys to the Action. Anything you add to the secrets will be automatically passed to your action at runtime.
Name the keys “SSH_KEY_PRIVATE” and “SSH_KEY_PUBLIC” as per below:
Step 4. Create the Action/Workflow directory structure
Github actions live within a special directory within the repository itself. This directory is where you will store your Action config/yaml file, along with the build and deploy scripts you plan to use.
Generally you will use the following structure as it’s neat and easy to follow:
- .github/workflows/
- The actions directory where we store all of our action files.
- .github/workflows/scripts/
- The directory we keep all of our build and deploy Bash scripts.
- deploy-preprod.yml
- Our pre-production build & deploy action.
- deploy-prod.yml
- Our production build & deploy action.
Step 5. Create the Action Yaml
The Actions are configured via the use of Yaml files. We will use this to define an Action for each of our application environments (prod & preprod) and configure the action to run our build/deploy scripts.
Here is what they should look like:
name: DEPLOY PRODUCTIONon:push:branches: [ master ]
jobs:
  deploy-prod:
    runs-on: ubuntu-latest
    steps:
      - uses: actions/checkout@v2
      - name: ADD SSH KEY
        env:
          SSH_KEY_PUBLIC: ${{ secrets.SSH_KEY_PUBLIC }}
          SSH_KEY_PRIVATE: ${{ secrets.SSH_KEY_PRIVATE }}
        run: .github/workflows/scripts/ssh-config.sh
      - name: BUILD
        run: .github/workflows/scripts/build.sh
      - name: DEPLOY TO PRODUCTION
        run: .github/workflows/scripts/deploy-prod.sh
Here’s the breakdown of what you’re doing in this file.
- branches: [ master ]
- Defining this action to trigger on commits pushed to the master branch.
- run: .github/workflows/scripts/ssh-config.sh
- Running your SSH configuration script which uses the secrets you set up earlier.
- run: .github/workflows/scripts/build.sh
- Running the build. E.g. Composer, NPM etc.
- run: .github/workflows/scripts/deploy-prod.sh
- Running the deploy script to push to the “-built” branch.
You will obviously need to create a similar yaml file for each of your environments.
Step 6. Create the SSH Config Script
Once the action is running you need a way to configure the SSH environment so you can push to the repository. You do this via a script which you should create at:
.github/workflows/scripts/ssh-config.sh
Here is what this script should look like:
#!/bin/bash
# Configure SSH keys on the Github Actions container.
set -e
# CONFIG
SSH_PATH="$HOME/.ssh"
SSH_KNOWN_HOSTS_PATH="$SSH_PATH/known_hosts"
SSH_PRIV_KEY_PATH="$SSH_PATH/id_rsa"
SSH_PUB_KEY_PATH="$SSH_PATH/id_rsa.pub"
# SSH_PRIV_KEY_PATH="$SSH_PATH/deploy.key"
# SSH_PUB_KEY_PATH="$SSH_PATH/deploy.pub"
# END CONFIG
echo "CREATING SSH KEY $SSH_PRIV_KEY_PATH"
mkdir "$SSH_PATH"
echo "$SSH_KEY_PRIVATE" > "$SSH_PRIV_KEY_PATH"
chmod 0600 "$SSH_PRIV_KEY_PATH"
echo -n "$SSH_PRIV_KEY_PATH FINGERPRINT = " && ssh-keygen -lf "$SSH_PRIV_KEY_PATH"
echo "$SSH_KEY_PUBLIC" > "$SSH_PUB_KEY_PATH"
chmod 0644 "$SSH_PUB_KEY_PATH"
echo -n "$SSH_PUB_KEY_PATH FINGERPRINT = " && ssh-keygen -lf "$SSH_PUB_KEY_PATH"
echo "ADDING GIT SSH KEY $SSH_PRIV_KEY_PATH"
git config --global core.sshCommand "/usr/bin/ssh -i $SSH_PRIV_KEY_PATH -o UserKnownHostsFile=$SSH_KNOWN_HOSTS_PATH"
ssh-keyscan -t rsa bitbucket.org >> ~/.ssh/known_hosts
Step 7. Create the Build Script
In order to build the application, you need to create the scripts that will run the build process. These build commands should be added to the build.sh file, which lives here: .github/workflows/scripts/build.sh
This script is obviously going to differ for each site. Here is an example of what that file might look like:
#!/bin/bash
set -e
cd themes/mytheme/
npm install
npm run prod
Step 8. Create the Deploy Script
The final step in this process is to create the script that will actually deploy the built files to the environment. This involves committing the files built by the build script into the repository and pushing the changes to the respective “-built” branch.
This script will be fairly standard across all sites as the process is the same. You should be able to copy and paste the following to .github/workflows/scripts/deploy-prod.sh and update the REPO and ENV variables. You will need a separate version of this script for each of the environments, i.e. prod & preprod.
#!/bin/bash
set -e
# CONFIG
ENV="prod"
REPO='[email protected]:wpcomvip/mysite.git'
# END CONFIG
REPO_PATH=`pwd`
WORKFLOWS_PATH="$REPO_PATH/.github/workflows"
SCRIPTS_PATH="$WORKFLOWS_PATH/scripts"
HEAD_COMMIT_HASH=`git rev-parse --verify HEAD`
HEAD_COMMIT_MESSAGE=`git log -1 --pretty=%B`
DEPLOY_COMMIT_MESSAGE="Deploy $ENV - $HEAD_COMMIT_HASH - $HEAD_COMMIT_MESSAGE"
DEPLOY_COMMIT_MESSAGE=`echo -n $DEPLOY_COMMIT_MESSAGE | tr -d "'"`
echo "REPO_PATH = $REPO_PATH"
# ADD FAKE USER DETAILS, OTHERWISE GIT COMPLAINS
git config --global user.email "[email protected]"
git config --global user.name "Deploy"
# COMMIT THE COMPLETED BUILD TO GITHUB
echo "CLONING DEPLOY $REPO"
cd .. && git clone --single-branch --branch master-built --depth 1 $REPO deploy/
echo "RSYNCING FILES"
cd deploy && rsync -avzq --delete --exclude-from=$WORKFLOWS_PATH/.deployignore $REPO_PATH/* .
rm -rf client-mu-plugins/vendor/*/*/.git  # Remove vendor/ git repos to prevent confusion of git.
git status  # Show status in actions build for debugging purposes.
echo "COMMITTING BUILT FILES"
git add . && git commit -m "$DEPLOY_COMMIT_MESSAGE"
git push origin master-built
echo "DONE"
Step 9. Profit
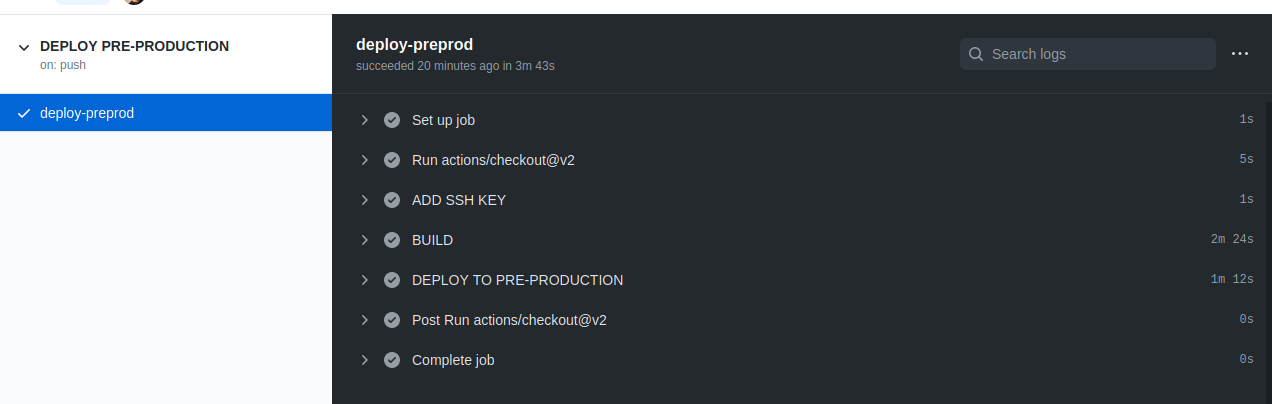
You’re done!
And if you’ve followed this process correctly, you should now have a functioning deploy environment on WordPress VIP.
READ MORE: A Developer’s Guide to Iterative Web Builds